0x00 准备工作
0x01 本地生成hexo文件
- 在本地新建一个文件夹 e.g. D:/Hexo ;
- 在D:/Hexo目录下鼠标右键”Git Bash Here”,输入:
hexo init; - 输入:
hexo g生成静态网页,hexo s启动本地服务预览; - 完成后Hexo文件夹会生成以下内容:
. ├── _config.yml ├── package.json ├── scaffolds ├── source | ├── _drafts | └── _posts └── themes - 打开本地浏览器 输入:
http://localhost:4000进行访问。
0x02 将本地hexo推送到GitHub
- 在GitHub上创建名字为 zhangsan.github.io 的项目zhangsan是自己的github用户名;
- 打开
D:/Hexo/_config.yml配置文件,修改以下内容为http://zhangsan.github.io:# URL ## If your site is put in a subdirectory, set url as 'http://yoursite.com/child' and root as '/child/' url: http://zhangsan.github.io - 打开
D:/Hexo/_config配置文件,在文末的deploy做以下设置:deploy: type: git repository: https://github.com/zhangsan/zhangsan.github.io.git branch: master - 执行:
npm install hexo-deployer-git –save(此命令最好在管理员权限的cmd下执行); - 执行:hexo clear (一般情况下不用执行这个命令,当网站错误打不开的时候再执行它!);
- 执行:hexo g (本地生成静态文件);
- 执行:hexo d (将本地静态文件推送至Github);
- 期间会弹出github登录框按提示登录即可,登录成功一次往后不用重复登录;
- 通过
http://zhangsan.github.io即可访问。
0x03 绑定自己的域名
- 域名服务商-控制面板-DNS解析—添加CNAME记录:
@ >>> zhangsan.github.ioOR `www >>> zhangsan.github.io` - 在
Hexo/sorce新建CNAME文件写入域名,CNAME文件,注意没有文件后缀; - 执行:hexo g
- 执行:hexo s(本地预览,可以跳过)
- 执行:hexo d
0x04 使用next主题并给网站添加浏览器logo
- 主题下载,next在github下载,并把next文件夹放到temes文件夹;
- 使用next主题,编辑
Hexo/_config.yml以下内容:##Themes: https://hexo.io/themes/theme: next - 将尺寸为32x32 favicon.ico 文件放在
hexo/source/文件夹内,然后修改Hexo\themes\next\_config.yml为:# Put your favicon.ico into `hexo-site/source/` directory. favicon: /favicon.ico - 编辑
Hexo/_config.yml以下内容:# Place your favicon.ico to /source directory. favicon: /favicon.ico
0x05 将网站显示为中文
- 编辑
D:/Hexo/_config.yml配置文件:language: zh-Hans #将默认改成zh-Hans timezone: - 在
Hexo/next/lanhuages目录下的zh-Hans.yml文件可以自行修改,增加和删除。
0x06 添加菜单和自定义菜单前的图标
- 编辑
themes\next\_config.yml,到menu:字段,在该字段下添加一个字段;menu: home: / about: /about ...... - 自定义小图标,关于next使用的小图标你可以通过这个网站Font Awesome来查看自己喜欢的图标,然后copy图标名,编辑
Hexo\themes\next\_config.yml,将对应的图标名换成自己喜欢的小图标;menu_icons: enable: true #KeyMapsToMenuItemKey: NameOfTheIconFromFontAwesome home: home about: mortar-board categories: smile-o schedule: calendar tags: diamond archives: angellist sitemap: sitemap commonweal: heartbeat
0x07 隐藏网页底部powered By Hexo / 强力驱动
打开themes/next/layout/_partials/footer.swig,使用””隐藏之间的代码即可,或者直接删除。
<!--
<div class="powered-by">
  {{ __('footer.powered', 'Hexo') }}
</div>
<div class="theme-info">
  {{ __('footer.theme') }} -
  <a class="theme-link" rel="external nofollow" href="https://github.com/iissnan/hexo-theme-next">
    NexT.{{ theme.scheme }}
  </a>
</div>
0x08 增加本地搜索功能
安装 hexo-generator-searchdb,在站点的根目录下执行以下命令:$ npm install hexo-generator-searchdb --save
如果报错多执行几次,有的时候是网络原因,最好在管理员权限下的cmd里执行npm安装命令。
编辑Hexo/_config.yml,新增以下内容:
search:
  path: search.xml
  field: post
  format: html
  limit: 10000
0x09 使用来必力评论功能
- 到livere注册账号,安装来必力,记录以下内容:
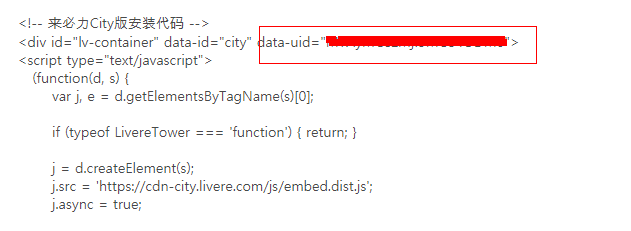 - 在
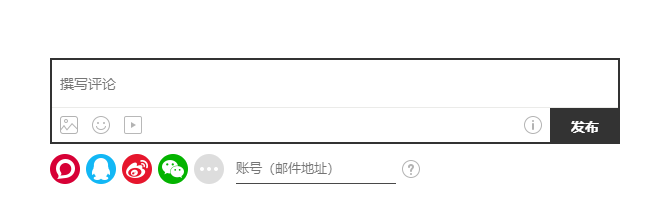
next/_config.yml的此处加上自己的livere的uid:livere_uid: your uid - 然后去博客查看吧文章下面会看到以下景象: